Tuesday 28 February 2012

Horizontal Sponged Stripe NOTD


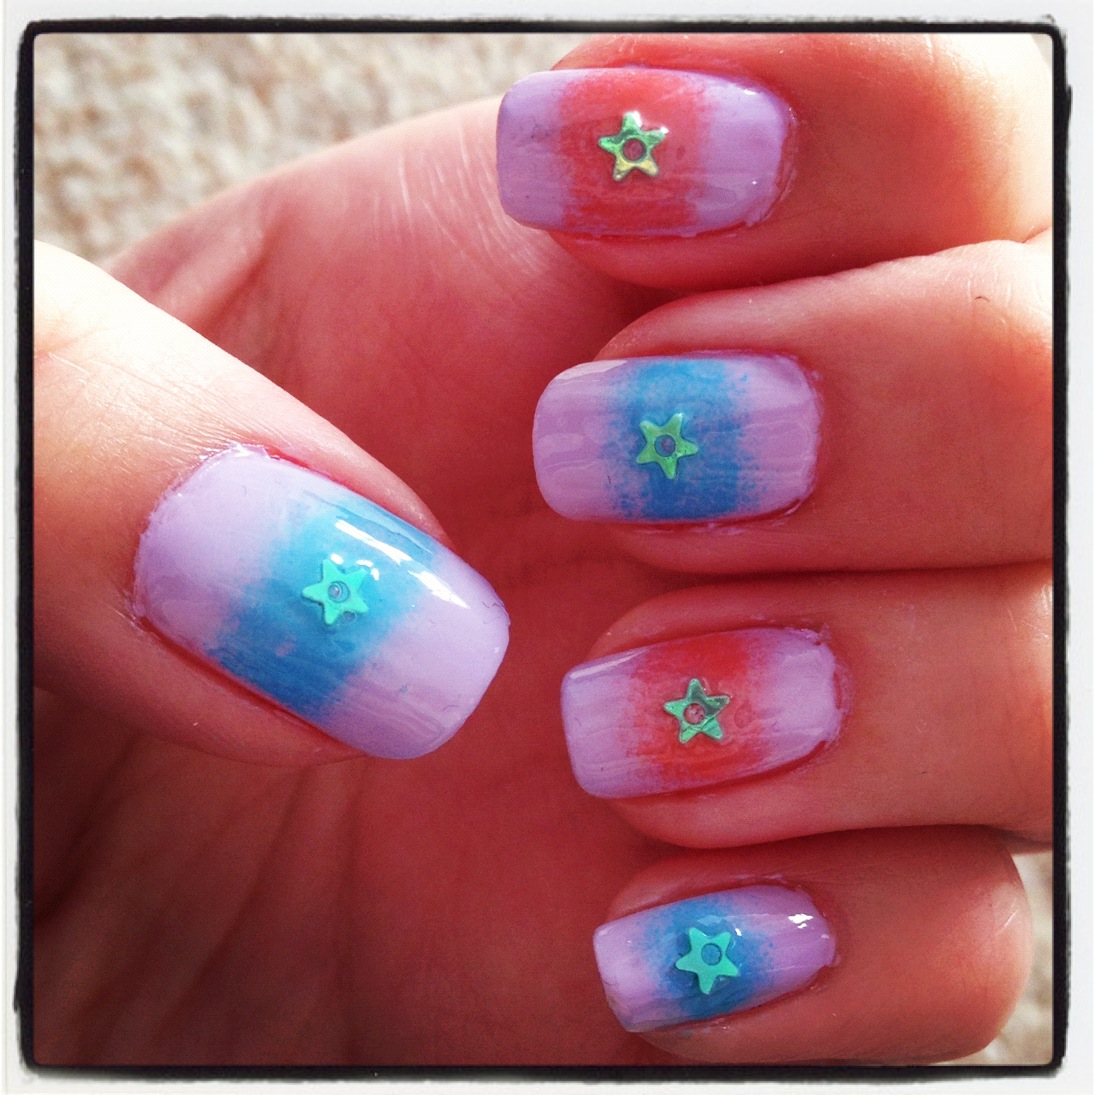
Step 1: Paint the base colour.

Here, I used two coats of OPI Nail Lacquer in Rumple's Wiggin'. 

Step 2: Sponge the horizontal lines.

I applied three stripes of polish onto a sponge - OPI Nail Lacquer in Rumple's Wiggin' and Barry M Nail Paint in 306 Blueberry Ice Cream. I then dabbed the sponge across three of my nails which resulted in a fading horizontal stripe. 


Step 3: Sponge the other horizontal stripes.

Using the same technique, I sponged the other nails with OPI Nail Lacquer in Rumple's Wiggin' and Topshop Nails in Art School. 


Step 4: Adding sparkle!

I felt like a change from using glitter so I chose to use small green star sequins in the centres of my nails to add some sparkle to my manicure, using a touch of 17 Double Gloss Top Coat. 

Step 5: Apply a top coat.

Two coats of Seche Vite Dry Fast Top Coat have sealed in my design and sequins. I cleaned up the edges using a cotton bud (aka Q-tip) and that's it! 


Hope you like this design :)

Also, I'm always looking for new designs to create so if you have any ideas, leave me a comment and I'll try and put my spin on it. 

Love love and naillove!!
Toffee xXxXx

Sunday 26 February 2012

Instagram (024)

Lack of posts again... I have things to post but no time to write! I've been getting up at 6:30 and getting home at 20:00. Then bed by 22:00 to get up the next day... I'm going to try and write some posts this weekend to schedule for the week. SOZ.

On the way to Sunday Family Lunch

Sunset over London from the 11th floor :)

ooooooooh!

First driving lesson in a while...

Pancake with Ben & Jerry's Phish Food Ice Cream <3

Mum & I messing about before we leave for work LOL

Rubbish hair before chopping off!

Skinny White Caffe Mocha. Yummm

My new hurr by Rush <3

Carnival Day at work so big orange flower in the hair :D

Don't see many lollipop ladies around anymore!

Morning sun <3

Dad & Mother on their Wedding day (10th March 1979)

Me and the Twin Towers in USA (1996?)

Mother and I did a little reminiscing today. Looking through our old photographs and albums :)

Hope you've had a good week as it gets warmer moving into Spring (in the UK anyway!).

Love love and instagramlove!!
Toffee xXxXx

Saturday 25 February 2012

Shoes by Nails Inc NOTD

I went to the Sadler's Wells theatre in January and spotted this on display as I was purchasing a programme.


Once I saw the unique colour and that it was by Nails Inc, I had to get it! I believe its the colour of the shoes from the ballet "The Red Shoes". 


I've worn this colour on my hands for the past week and I do really like it. It's got a slight orange tint but that makes it so unique to other reds. 


What do you think of this bright shade??

Love love and nailsincshoeslove!!
Toffee xXxXx

Sunday 19 February 2012

Instagram (023)

Sorry again for the lack of blog posts... I hope you've enjoyed my nail tutorials though :)

This week is still a bit hectic trying to settle into my work schedule...

Bop It keyring! Still working :D

Work time.

Bright pink seats on the central line

Sneaky pic of me on the train ;)

Sweet message in my Valentine's card from work!

White Hot Chocolate. (forgot to ask for skinny...)

New Spring Summer 2012 Ugg collection :)

On the train back with my gift from Ugg ^_~

Photo booths kinda rock - especially when they make your skin look flawless!

Another day at the office...

Editing a video :)

Car ride pic :P

New book. New love <3

I've read the first chapter and it's awesome. Can't wait to read the rest!

Hope you all had a wonderful week x


Love love and instagramlove!!
Toffee xXxXx

Friday 17 February 2012

Carmine Beauty Box Review *video*


Love love and Carminelove!!
Toffee xXxXx

Thursday 16 February 2012

Pretty Check Pattern NOTD


This cute girly design looks more complicated than it is!

Step 1: Base colour coat

I applied two coats of Topshop Art School, a beautiful coral colour on the paler side of the spectrum. 

Step 2: Apply the first set of thick lines

Using Topshop Bees Knees, I used the brush to draw some thick parallel lines on each nail.

Step 3: Add the second set of thick lines

Using another pale shade (OPI Rumple's Wiggin'), I applied another two parallel thick lines with the nail polish brush, roughly perpendicular to the previous lines. 

Step 4: Add the thin white lines

I used a striper brush (Inglot Nail Art Enamel in 29 White) to draw two thin lines which run parallel with the thick lines. 

Step 5: Add lines of glitter :)

Using a silver glitter striper polish, I drew two lines next to the previous white lines :) Glitter always jazzes up nail designs, don't ya think? 

Step 6: Apply a top coat.
I used two coats of 17 Double Gloss Top Coat which sealed in my design. 


Hope you all like this design :)

Love love and prettychecklove!!
Toffee xXxXx

Monday 13 February 2012

Graffiti Hearts NOTD (Valentine's Design)

♥ This design is probably my favourite that I've done this year :)


It's cute, fun and can be worn any time of the year, not just Valentine's day! So here's a step-by-step tutorial you can follow to recreate this design!

Step 1: Base colour

I used two coats of Revlon Nail Enamel in 050 White On White to give a nice even opaque white base coat as a blank canvas for the 'graffiti' to be applied to.

Step 2: Dark Pink Graffiti

I used a pulled-off corner of a make up sponge to dab on some OPI Dim Sum Plum to my white nails. I used the brush to apply some polish to the sponge and dabbed off the excess onto a piece of paper before application. I did random spots of where to apply so that the nails all looked different.
You do not have to use pinks for this design. In fact, I think using a blue and green would look quite effective! 

Step 3: Light Pink Graffiti

This step is similar to the previous step, except I used a different colour and a smaller sponge. In this case, I mixed a drop of OPI Shorts Story with a touch of Revlon 050 White On White to get a paler pink. I then dipped my sponge into the mixed polish and dabbed this onto my nails in areas I hadn't covered. 

Step 4: Draw on the hearts!

Using the striper brush end of my Inglot Nail Art Enamel pen in 36 (Black), I drew some large hearts in random sections of each nail. 


I then drew more hearts to fill in the larger gaps and then I used the nib end of the polish to add little solid black hearts to fill in the smaller spaces.

Step 5: Glitter hearts!!!

At first, I wasn't sure if this step would work but you can't go too wrong when adding glitter! I used a pink glitter striper polish to draw large heart outlines in random areas on top of my design. 

Step 6: Finish with a top coat

This is just to seal in the design and protect it from chipping :) For reference, I initially used Sech Vite Dry Fast Top Coat and then a coat of 17 Double Gloss Top Coat. 

Here is a picture taken with flash:

And that's it! Nothing more to it ;)

♥ ♥ ♥


♥ Hope you have a great Valentine's day, whatever you're doing ♥

Love love and graffitiheartslove!!
Toffee xXxXx